We usually know that each tab of your browser bar contains the title of the site page and a small icon that receives the name of the favicon or page icon. Also, sometimes a common question appears that what is a favicon? Well, a favicon is one kind of tiny image that appears next to the title in your WordPress Website. Today in this article I am going to give some amazing tips to add a favicon in WordPress. So without delay, let’s start:
Table of Contents
Why Insert a Favicon in WordPress?
The term favicon is short for “favorite icon”. This little icon is a staple on a company’s website. It is displayed in the tab bar, bookmarks bar, WordPress mobile apps, home icons, and mobile search results. Therefore, it is recommended to choose a meaningful and unique icon as the favicon. The favicon brings with it many advantages like:
- Provides seriousness and professionalism to the website.
- Makes it easier for the user to recognize the company and its services on the web and, therefore, improves the user experience.
- It has a positive effect on the SEO of the page.
- When a user has multiple tabs open in the browser, the titles are hidden, but the favicon always remains visible.
How to Add a Favicon in WordPress
There are two different ways to insert a favicon in WordPress. With the WordPress Customizer, and with a plugin. Next, I have explained each of these options.
In this article, I have explained how to insert an already created favicon in WordPress. You can create it with any graphic design program or with our Favicon Generator.
Method 1: WordPress Customizer
The easiest and fastest way to insert a favicon in WordPress is available since version 4.3 of the platform. With this tool, you can upload the favicon to WordPress, trim it if necessary, and configure it in a couple of clicks.
If you use this method, the recommended minimum size for the favicon is 512 x 512 pixels. However, in the browser tab, the image will be displayed at a size of 16 x 16 pixels. Make sure your favicon is recognizable at this size. Next, I have explained step by step how to insert your favicon with the WordPress Customizer.
Step 1: Open the Customizer
In the WordPress options bar, click on “Appearance” and then “Customize”.
![]()
Step 2: Open the Option “Website Identity”
Select the “Site Identity” option.
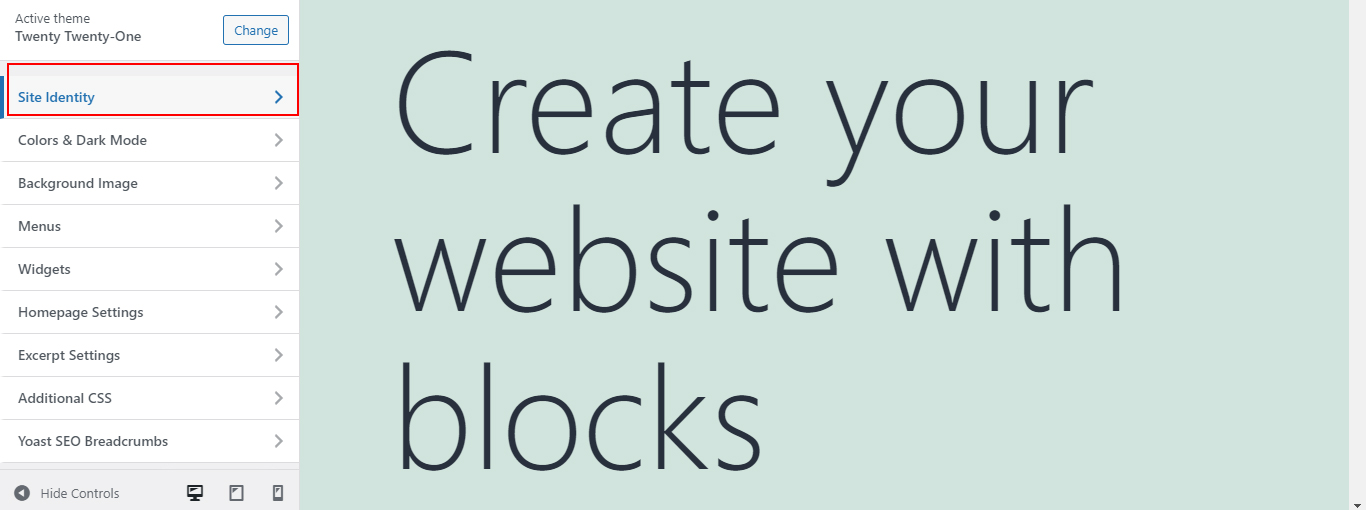
With the option “Site Identity”, you can customize the title of your website and select your favicon for WordPress.
Step 3: Select Your Favicon
In this section, you can configure the title and subtitle of your website. This information will be found next to the favicon in the browser tab. In the “Site Icon” section, click the “Select site icon” button to customize your WordPress favicon.
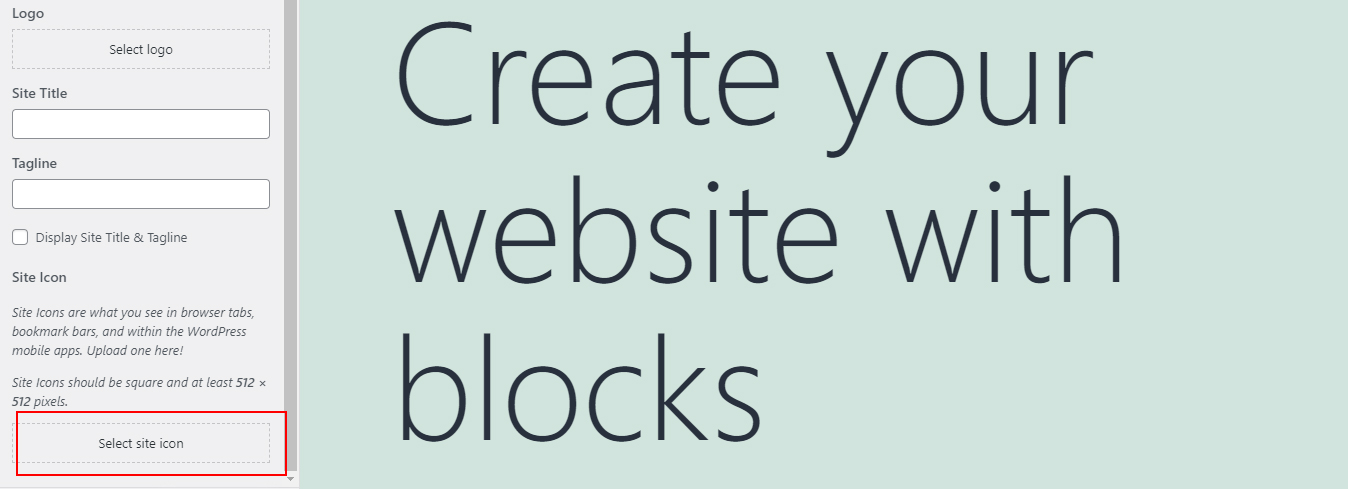
Step 4: Select Your Favicon
Next, the WordPress media library will open. If you have already uploaded your favicon, select it. Otherwise, click on the “Select Files” tab and select the file you want from your computer. Confirm your selection by clicking on “Select”.
![]()
Select the WordPress favicon from the media library or upload a new image.
Step 5: Cut Out Your Favicon
Afterward, you will have the possibility to crop the image. WordPress automatically shows a current preview of the favicon on the right side. When you have adjusted the crop, confirm it with the “Crop Image” button. If your favicon already has the correct format, click on “Skip Cropping”.
![]()
WordPress will insert the favicon automatically. If you want to change it in the future, go back to this settings section.
You May Also Read: How to Add Facebook Pixel to WordPress
Method 2: Insert Favicon with a Plugin
WordPress offers a plugin for just about anything, including inserting favicons. One of the most popular free plugins is Favicon by RealFaviconGenerator. Compared to the WordPress Customizer, it offers additional configuration options to improve the favicon compatibility with different devices and applications. Next, I have explained explain how to configure a favicon in WordPress with this plugin.
Step 1: Install the Plugin
In the WordPress menu, open the “Plugins” section and then click “Add new”.
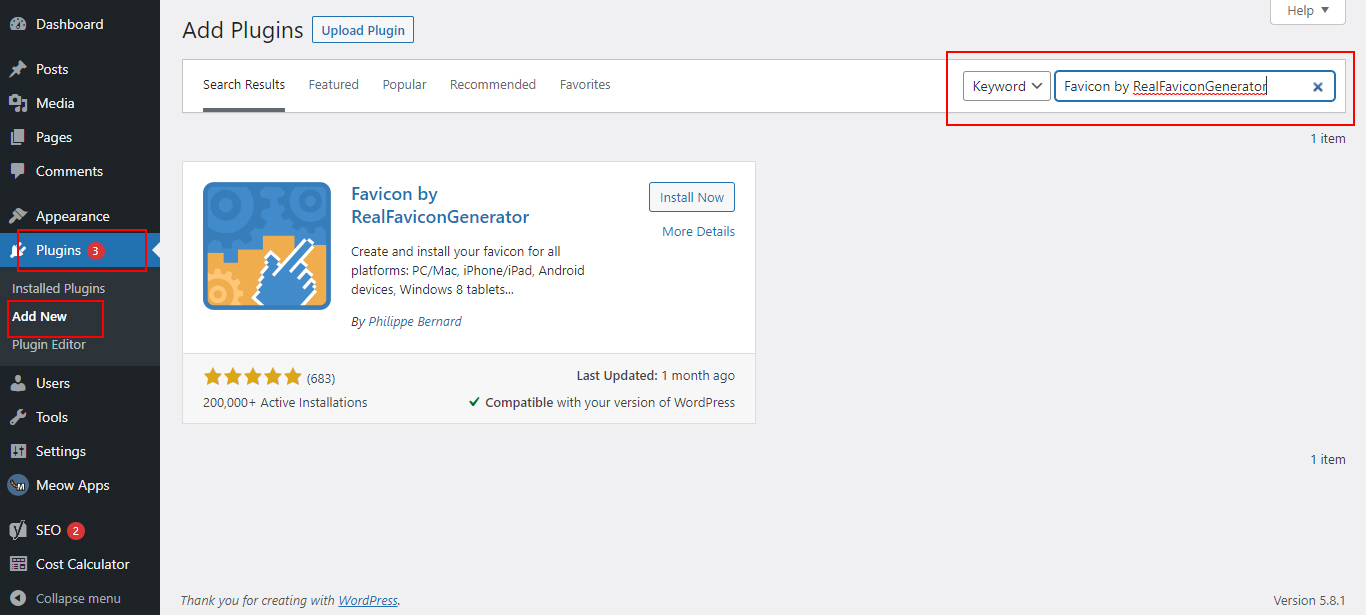
Find the Favicon by RealFaviconGenerator plugin, select it from the search results, and install it. Then click “Activate” and the plugin will be ready to use.
![]()
Step 2: Open the Plugin Settings
After installing the plugin, go to the menu and click on “Appearance” ( ” Appearance “) and then ” Favicon “. Here you will find the plugin settings.
![]()
The favicon settings are found in the “Appearance” section.
Step 3: Select the Favicon
Click “Select from the Media Library ” to open the WordPress media library and select your favicon image. The favicon must be at least 70 x 70 pixels in size, but it is recommended that it be 260 x 260 pixels or larger. After selecting the image, confirm your selection by clicking the “Generate Favicon” button.
![]()
Step 4: Confirm the Insertion of the Favicon
The plugin will automatically redirect you to your website. When the image has loaded, you will also have some optional settings. If you want, you can adjust the display of the favicon for the desktop browser, for Google search results, or for different smartphone formats.
If you have made all the settings or want to skip the rest, click the ” Generate your Favicons and HTML code ” button at the bottom of the page.
The plugin will redirect you back to the backend and confirm the installation of the favicon in WordPress.
![]()
The plugin will redirect you to the Administration Panel.
Conclusion
That’s it for today. I have tried my best to describe all the steps with proper details. Hopefully, you will be able to add favicons in WordPress with the help of my guideline. If you face any problem, don’t hesitate to inform me. I will try my best to help you with a proper solution as fast as possible.


